What are 802.11n Wireless Drivers?
Think of 802.11n drivers as translators between your computer and the wireless network adapter. When you want to connect to Wi-Fi, your Windows operating system can’t directly communicate with the wireless hardware inside your laptop or desktop computer. That’s where WLAN drivers come in.
These small software programs act as a bridge, converting your computer’s requests into commands your wireless network adapter can understand. Without the proper 802.11n driver installed, your network adapter becomes useless, like having a phone without knowing the language to make calls.
Your wireless LAN driver handles everything from scanning for available networks to managing connection security. It controls how fast data transfers, manages power consumption, and ensures your device follows proper Wi-Fi protocols. When you see available networks in your Wi-Fi list, that’s your driver working behind the scenes.
Most importantly, 802.11n drivers are specific to your hardware model. A Broadcom network adapter needs different drivers than a Realtek wireless adapter, even though both support the same 802.11n standard. This is why generic “one-size-fits-all” solutions often fail to work properly.
802.11n vs Other Wireless Standards Explained
The wireless world can feel confusing with all those numbers and letters. Let’s break down what 802.11n means and how it compares to other Wi-Fi standards you might encounter.
802.11n (Wi-Fi 4) was introduced in 2009 and revolutionized wireless networking. It brought significant improvements over older standards like 802.11g, offering speeds up to 600 Mbps and better range through MIMO (Multiple Input, Multiple Output) technology. Most 802.11n adapters work on both 2.4GHz and 5GHz frequency bands.
802.11ac vs 802.11n represents a major jump in performance. While 802.11n maxes out around 600 Mbps, 802.11ac (Wi-Fi 5) can achieve speeds over 1 Gbps. However, 802.11ac requires newer hardware and isn’t always necessary for basic internet browsing and email.
802.11ax (Wi-Fi 6) is the newest standard, offering incredible speeds and better performance in crowded networks. But here’s the key point: if your computer has an 802.11n network adapter, you need 802.11n drivers – not newer Wi-Fi 6 drivers.
Many people wonder if they should upgrade from 802.11n. For most home users doing basic web browsing, streaming videos, and video calls, 802.11n provides plenty of speed. The decision to upgrade usually comes down to your internet speed plan and how many devices share your network.
Signs You Need to Update Your 802.11n Driver
Your computer gives clear signals when it’s time to update your wireless driver. Recognizing these symptoms early can save you hours of frustration and connectivity issues.
Slow Internet Speeds:
If your internet feels sluggish despite paying for faster speeds, outdated 802.11n drivers might be the culprit. Your network adapter driver controls how efficiently data transfers between your computer and router. An old or corrupted driver can significantly throttle your connection speed.
Frequent Disconnections:
Does your Wi-Fi keep dropping out randomly? Do you find yourself constantly reconnecting to your wireless network? This classic symptom often points to driver issues. Your WLAN driver manages the connection stability, and when it’s not working properly, you’ll experience these annoying disconnections.
“Network Adapter Not Found” Errors:
When Windows can’t detect your wireless adapter in Device Manager, you’re likely dealing with a missing or corrupted 802.11n driver. This error makes your wireless hardware invisible to your operating system, essentially turning your laptop into a desktop computer that needs an Ethernet cable.
Missing Wi-Fi Networks:
If networks that other devices can see don’t appear in your available networks list, your wireless adapter driver might be malfunctioning. A properly functioning driver should detect all compatible networks within range.
Yellow Triangle in Device Manager:
That warning triangle next to your network adapter in Device Manager is Windows telling you there’s a driver problem. This visual cue means your system recognizes the hardware but can’t properly communicate with it.
Windows Update Installation Failures:
Sometimes Windows tries to automatically install network adapter drivers but fails repeatedly. This usually happens when your current driver is severely outdated or incompatible with recent Windows updates.
Can’t Connect to 5GHz Networks:
If your 802.11n adapter supports dual-band connections but only sees 2.4GHz networks, you might need to update your wireless driver to unlock full functionality.
The good news? Most of these issues resolve quickly once you install the correct 802.11n driver for your specific network adapter model. In the following sections, we’ll walk you through exactly how to identify your hardware and get the right drivers installed.
Before You Start: Pre-Installation Checklist
Identifying Your Wireless Network Adapter
Before downloading any 802.11n drivers, you need to know exactly which wireless adapter is inside your computer. Installing the wrong driver can cause more problems than it solves, so taking time to identify your hardware properly is crucial.
Using Device Manager (Step-by-Step)
Device Manager is Windows’ built-in tool for viewing and managing all hardware components. Here’s how to find your wireless adapter information:
- Right-click the Windows Start button and select “Device Manager”
- Look for “Network adapters” and click the arrow to expand the section
- Find your wireless adapter – it usually contains words like “Wireless,” “Wi-Fi,” “802.11n,” or “WLAN”
- Right-click your wireless adapter and select “Properties”
- Click the “Details” tab, then select “Hardware Ids” from the dropdown menu
The Hardware ID shows crucial information like “VEN_” (vendor) and “DEV_” (device) codes. Write down these numbers – they’re like your adapter’s fingerprint and help you find the exact 802.11n driver you need.
Common Hardware ID Examples:
- Broadcom adapters often start with “VEN_14E4”
- Intel wireless adapters typically show “VEN_8086”
- Realtek USB wireless adapters display “VEN_0BDA”
Finding Model Numbers on Physical Hardware
Sometimes Device Manager shows “Unknown device” or generic names. When this happens, check your physical hardware for model information.
For laptops, look for a sticker on the bottom that lists wireless specifications. Many manufacturers include the exact wireless adapter model number here. Desktop computers with USB wireless adapters can simply unplug the device and check for printed model numbers.
Built-in wireless cards in desktop computers require opening the computer case. If you’re not comfortable doing this, the Device Manager method usually provides enough information for driver downloads.
Using System Information Tools
Windows includes additional tools for hardware identification. Type “msinfo32” in the Start menu search box and press Enter. This opens System Information, where you can browse to “Components” > “Network” > “Adapter” for detailed wireless adapter information.
Third-party tools like CPU-Z or HWiNFO can also identify network hardware, but the built-in Windows tools typically provide everything you need for finding the right 802.11n drivers.
Creating a System Restore Point
Installing drivers always carries some risk. Even official manufacturer drivers can sometimes cause conflicts with other software or create compatibility issues. Creating a system restore point before installing your 802.11n driver gives you an easy way to undo changes if something goes wrong.
Why Backup is Essential
Think of a system restore point as a safety net. If your new wireless driver causes blue screen errors, prevents Windows from starting, or creates other system problems, you can quickly return your computer to its previous working state.
This is especially important when installing network adapter drivers because wireless connectivity issues can make it difficult to download fixes or alternative drivers later. Having a restore point means you can always get back to a working system.
Step-by-Step Restore Point Creation
Creating a restore point takes just a few minutes:
- Type “Create a restore point” in the Windows search bar and press Enter
- Click the “Create” button in the System Protection tab
- Give your restore point a descriptive name like “Before 802.11n Driver Install”
- Click “Create” and wait for Windows to finish the backup process
- You’ll see a confirmation message when the restore point is complete
Windows automatically includes the current date and time in restore point names, so you’ll always know when it was created.
How to Rollback if Installation Fails
If your 802.11n driver installation causes problems, here’s how to restore your system:
- Boot your computer normally (or use Safe Mode if Windows won’t start normally)
- Search for “Create a restore point” and open System Properties
- Click “System Restore” button
- Select your restore point from the list
- Follow the prompts to restore your system to its previous state
The restoration process usually takes 10-20 minutes and requires a restart. All your personal files remain safe, but any software installed after the restore point will need reinstalling.
Downloading Drivers Safely
The internet is full of websites offering driver downloads, but many contain malware, outdated files, or incorrect drivers that can damage your system. Knowing where to safely download 802.11n drivers protects both your computer and your personal data.
Official Manufacturer Websites vs Third-Party Sources
Always download drivers directly from hardware manufacturers when possible. Dell computers should get drivers from Dell’s support website, HP computers from HP’s support site, and so on. For wireless adapter manufacturers like Broadcom, Intel, or Realtek, go directly to their official websites.
Official manufacturer sites guarantee authentic drivers that have been tested with your specific hardware. They also provide the latest versions with security updates and bug fixes.
Third-party driver sites often host outdated versions, modified files, or drivers bundled with unwanted software. Some malicious sites disguise malware as driver files, potentially compromising your entire system.
Warning Signs of Unsafe Driver Sites:
- Require payment for “premium” driver downloads
- Bundle drivers with toolbars or additional software
- Display excessive pop-up advertisements
- Claim to fix “all driver problems” with one download
- Don’t clearly identify the driver version or hardware compatibility
Verifying File Authenticity
Even when downloading from official sources, verify your driver files before installation:
- Check file sizes – driver files are usually 5-50 MB for wireless adapters
- Scan downloads with your antivirus software before opening
- Verify digital signatures by right-clicking the file and checking Properties > Digital Signatures
- Compare file checksums if provided by the manufacturer
Safe Download Best Practices
Create a dedicated folder like “Drivers” on your desktop for organizing downloaded files. This makes it easier to find drivers later and helps you avoid accidentally running the wrong installer.
Download drivers only when connected to a secure network. Public Wi-Fi networks increase the risk of man-in-the-middle attacks that could compromise your downloads.
Keep downloaded 802.11n drivers even after successful installation. Store them on a USB drive or backup location so you can reinstall quickly if needed without re-downloading.
Step-by-Step Driver Installation Guide
Method 1: Automatic Installation via Windows Update
Windows Update often provides 802.11n drivers automatically, making this the easiest installation method for most users. Microsoft partners with hardware manufacturers to distribute tested drivers through their update service.
Accessing Windows Update
- Open Windows Settings by pressing Windows key + I
- Click “Update & Security” (Windows 10) or “Windows Update” (Windows 11)
- Click “Check for updates” and wait for Windows to scan
- Look for any network adapter driver updates in the results
- Click “Download and install” for any wireless driver updates
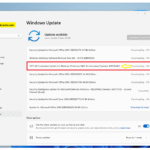
Searching for Driver Updates
If Windows Update doesn’t find your 802.11n driver automatically, try the manual search option:
- In Windows Update settings, click “View optional updates”
- Expand the “Driver updates” section
- Look for your wireless network adapter in the list
- Check the box next to your 802.11n driver and click “Download and install”
Windows Update drivers undergo Microsoft’s compatibility testing, making them reliable choices for most 802.11n wireless adapters. However, they’re not always the newest versions available from manufacturers.
Installing and Verifying Updates
After installation, Windows typically requires a restart. Once your computer reboots, verify the driver installation worked:
- Open Device Manager (right-click Start button)
- Expand “Network adapters”
- Check that your wireless adapter shows no warning symbols
- Right-click your adapter and select “Properties” to view the driver version and date
Method 2: Manual Installation via Device Manager
When Windows Update can’t find your 802.11n driver, Device Manager offers a manual installation path. This method works well when you’ve already downloaded the correct driver file.
Right-Click Installation Process
- Open Device Manager and expand “Network adapters”
- Right-click your wireless adapter (may show as “Unknown device”)
- Select “Update driver” from the context menu
- Choose “Browse my computer for drivers”
- Click “Browse” and navigate to your downloaded 802.11n driver folder
- Make sure “Include subfolders” is checked and click “Next”
Windows will search through the driver files and attempt automatic installation. If successful, you’ll see a confirmation message and your wireless adapter should appear with its proper name in Device Manager.
Browsing for Driver Files
Sometimes you need to manually point Windows to specific driver files:
- In the driver update window, click “Let me pick from a list of available drivers”
- Click “Have Disk” button
- Browse to your driver folder and select the .inf file
- Choose your exact wireless adapter model from the list
- Click “Next” to begin installation
Handling Installation Prompts
Windows may display security warnings about unsigned drivers. Only proceed if you downloaded the 802.11n driver from the official manufacturer website. Never install unsigned drivers from unknown sources.
If installation fails with error messages, try running Device Manager as administrator. Right-click the Start button, select “Device Manager (Admin),” and repeat the installation process.
Method 3: Manufacturer Software Installation
Hardware manufacturers often provide dedicated software for managing 802.11n drivers and wireless settings. These tools typically offer more configuration options than Windows’ built-in methods.
Using Brand-Specific Utilities
Dell computers can use SupportAssist to automatically detect and install wireless drivers. Download SupportAssist from Dell’s website, run it, and let it scan your system for driver updates including 802.11n drivers.
HP Support Assistant works similarly for HP computers. It identifies your wireless adapter model and downloads the appropriate drivers directly from HP’s servers.
Lenovo System Update and ASUS MyASUS provide comparable functionality for their respective brands.
Running Executable Installer Files
When you download 802.11n drivers directly from manufacturer websites, they often come as executable (.exe) files:
- Right-click the downloaded driver file and select “Run as administrator”
- Follow the installation wizard prompts
- Accept license agreements (after reading them)
- Choose installation location if prompted
- Restart your computer when installation completes
Custom Installation Options
Advanced users can often choose custom installation options:
- Select specific driver components to install
- Choose installation directory
- Configure wireless adapter settings during setup
- Install additional management software or utilities
Most users should stick with “Typical” or “Recommended” installation options unless they have specific configuration requirements.
Method 4: Offline Installation (No Internet Connection)
Sometimes you need to install 802.11n drivers on a computer without internet access. This situation commonly occurs when wireless drivers become corrupted or after fresh Windows installations.
Downloading Drivers on Another Computer
Use a computer with internet access to visit your manufacturer’s support website. Search for your specific computer model or wireless adapter and download the 802.11n driver package. Make note of your computer’s exact model number and Windows version to ensure compatibility.
USB Transfer Methods
Copy the downloaded driver files to a USB flash drive, external hard drive, or burn them to a CD/DVD. Safely remove the storage device and connect it to the computer needing driver installation.
Manual File Extraction and Installation
Many manufacturer driver downloads come as compressed archives:
- Extract the driver files to a folder on your hard drive
- Open Device Manager and locate your wireless adapter
- Right-click the adapter and select “Update driver”
- Choose “Browse my computer for drivers”
- Navigate to the extracted driver folder and click “Next”
For computers without any internet connection, this offline method ensures you can still install the necessary 802.11n drivers to restore wireless functionality.
Brand-Specific Driver Downloads & Instructions
Dell 802.11n Drivers
Dell computers require specific wireless drivers matched to your exact model and service tag. Dell’s website provides precise compatibility matching to ensure optimal performance.
Dell Wireless 1520, 1540, 1560 Series
These popular Dell wireless cards support 802.11n networks and dual-band operation. Download drivers directly from Dell’s support website using your computer’s service tag for automatic hardware detection.
Common Dell wireless adapter models include:
- Dell Wireless 1520 802.11n WLAN Half-Mini Card
- Dell Wireless 1540 802.11n WLAN PCI Express Card
- Dell Wireless 1560 802.11n WLAN Half-Mini Card
OptiPlex and Latitude Compatibility
Business-class Dell computers like OptiPlex desktops and Latitude laptops often use Intel or Broadcom 802.11n adapters. Check your specific model’s tech specs to identify the wireless chipset before downloading drivers.
Dell SupportAssist Usage
SupportAssist automatically scans your Dell computer and recommends appropriate driver updates:
- Download SupportAssist from Dell’s website
- Install and run the application
- Click “Get started” and let it scan your system
- Review recommended wireless driver updates
- Click “Download and Install” for 802.11n drivers
HP 802.11n Drivers
HP computers use various wireless adapter manufacturers, making it essential to identify your specific hardware before downloading 802.11n drivers.
Broadcom and Intel Variants
HP laptops commonly include either Broadcom or Intel wireless adapters. Check Device Manager or your computer’s specifications to determine which type you have:
- Broadcom 802.11n adapters: Look for “BCM” in the hardware ID
- Intel Centrino/WiFi adapters: Show “Intel” in the adapter name
HP Support Assistant Integration
HP’s support software automatically detects your wireless hardware:
- Install HP Support Assistant from HP’s website
- Run the application and click “Updates”
- Look for wireless adapter driver updates in the results
- Install recommended 802.11n driver updates
Model-Specific Download Links
Visit HP’s support website and enter your computer’s model number or product number (found on a sticker on your laptop). The website will show all available drivers including 802.11n wireless drivers specifically tested for your hardware.
Acer 802.11n Drivers
Acer computers frequently use Atheros, Broadcom, or Intel wireless adapters. The WLan Driver 802.11n package mentioned in our research is specifically designed for Acer systems with Broadcom chipsets.
Acer Care Center Usage
Download Acer Care Center for automatic driver management:
- Visit Acer’s support website and download Care Center
- Install the application and register your Acer computer
- Click “Update” to scan for available driver updates
- Install any wireless adapter driver updates found
Aspire and TravelMate Series
Popular Acer laptop series like Aspire and TravelMate have specific 802.11n driver requirements. Check Acer’s support database using your laptop’s model number to find compatible drivers.
Legacy Model Support
Older Acer computers may require archived drivers. If current drivers don’t work with your system, look for “Legacy” or “Archive” driver sections on Acer’s support website.
Lenovo, ASUS, and Other Manufacturers
ASUS Computers
ASUS provides drivers through their support website and MyASUS application. Enter your laptop model (like “ASUS VivoBook S15”) to find compatible 802.11n drivers.
Lenovo Systems
Lenovo computers can use Lenovo System Update or manually download drivers from Lenovo’s support website. ThinkPad business laptops often use Intel wireless adapters.
Universal Driver Packages
Some manufacturers provide universal 802.11n driver packages that work across multiple computer models. These are convenient but may not offer all hardware-specific features.
Alternative Download Sources
When manufacturer websites don’t have the drivers you need, try:
- The wireless adapter manufacturer’s website (Intel, Broadcom, Realtek)
- Windows Update Catalog for Microsoft-certified drivers
- Driver backup utilities that save existing drivers before problems occur
Advanced Troubleshooting Solutions
Fixing Common Error Codes
Windows displays specific error codes when 802.11n drivers encounter problems. Understanding these codes helps you choose the right troubleshooting approach.
Code 10: Device Cannot Start
This error indicates Windows detected your wireless adapter but can’t initialize it properly. Common causes include corrupted drivers, hardware conflicts, or power management issues.
Solutions for Code 10 errors:
- Uninstall the current driver in Device Manager
- Restart your computer and let Windows reinstall the driver automatically
- Download fresh 802.11n drivers from the manufacturer
- Check power management settings for the wireless adapter
- Run Windows built-in Network Adapter troubleshooter
Code 43: Device Has Been Disabled
Code 43 means Windows has disabled your wireless adapter due to reported problems. This often happens after driver conflicts or hardware communication failures.
To fix Code 43 errors:
- Right-click your wireless adapter in Device Manager
- Select “Enable device” if available
- If enabling fails, uninstall and reinstall the 802.11n driver
- Check for Windows updates that might include driver fixes
- Try using System Restore to return to a working configuration
Code 28: Device Drivers Not Installed
This straightforward error means your wireless adapter lacks proper drivers. It commonly occurs after Windows updates or fresh installations.
Resolution steps:
- Right-click the device showing Code 28
- Select “Update driver” and search automatically
- If automatic search fails, browse to your downloaded 802.11n driver folder
- Use Device Manager’s “Add legacy hardware” wizard if needed
Yellow Triangle in Device Manager
The yellow warning triangle indicates driver problems, conflicts, or resource allocation issues. It’s one of the most common wireless adapter problems.
Troubleshooting yellow triangle warnings:
- Right-click the device and view Properties
- Check the “General” tab for specific error details
- Try updating the driver through Device Manager
- Uninstall the device and scan for hardware changes
- Disable and re-enable the wireless adapter
Resolving Installation Failures
Even correct 802.11n drivers sometimes fail to install due to system conflicts, security software interference, or corrupted Windows files.
“Driver Not Compatible” Errors
This error suggests you’re trying to install drivers designed for different hardware or Windows versions.
Solutions:
- Verify your wireless adapter’s exact model number
- Confirm you downloaded drivers for your Windows version (32-bit vs 64-bit)
- Try Windows compatibility mode for older drivers
- Check manufacturer websites for updated driver versions
- Use generic Microsoft drivers as temporary solutions
Installation Hanging or Freezing
When driver installation stops responding, several factors could be responsible:
- Temporarily disable antivirus software during installation
- Close unnecessary programs to free system resources
- Run the installer as administrator
- Try installing in Windows Safe Mode
- Use Windows System File Checker to repair corrupted files
Registry Conflicts and Cleanup
Previous driver installations sometimes leave registry entries that conflict with new 802.11n drivers.
Registry cleanup steps (Advanced users only):
- Create a full system backup before making registry changes
- Use built-in “Programs and Features” to uninstall old wireless software
- Run Windows Registry Cleaner utilities carefully
- Manually remove wireless adapter entries from Device Manager
- Restart and perform clean driver installation
Network Connectivity Issues After Installation
Successfully installing 802.11n drivers doesn’t guarantee perfect wireless connectivity. Post-installation problems require additional troubleshooting.
Driver Installed but No Internet Access
Your wireless adapter might connect to networks but fail to access the internet due to configuration problems.
Troubleshooting steps:
- Reset network adapters using Command Prompt:
netsh winsock reset - Flush DNS cache:
ipconfig /flushdns - Release and renew IP address:
ipconfig /releasethenipconfig /renew - Check proxy settings in browser and Windows
- Temporarily disable Windows Firewall to test connectivity
Slow Connection Speeds
If your 802.11n adapter connects but performs poorly, several factors might be limiting performance:
- Check wireless adapter power management settings
- Update router firmware and adjust channel settings
- Position USB wireless adapters away from interference sources
- Verify your internet plan speeds with wired connections
- Test different wireless networks to isolate the problem
Intermittent Disconnections
Frequent disconnections frustrate users and often indicate driver or power management problems:
- Disable “Allow computer to turn off this device” in Device Manager
- Update wireless router firmware
- Change wireless network channel to reduce interference
- Reset network stack:
netsh int ip reset - Check for overheating issues with laptop cooling
Advanced Registry and System File Solutions
When standard troubleshooting fails, advanced users can try registry modifications and system file repairs to resolve persistent 802.11n driver problems.
Netsh Winsock Reset Commands
The Winsock catalog can become corrupted, preventing proper network communication even with correct drivers installed:
- Open Command Prompt as administrator
- Type
netsh winsock reset catalogand press Enter - Type
netsh int ipv4 reset reset.logand press Enter - Type
netsh int ipv6 reset reset.logand press Enter - Restart your computer to apply changes
SFC /Scannow System File Checker
Corrupted Windows system files can interfere with 802.11n driver installation and operation:
- Open elevated Command Prompt (Run as administrator)
- Type
sfc /scannowand press Enter - Wait for the scan to complete (this may take 30+ minutes)
- If errors are found, run
DISM /Online /Cleanup-Image /RestoreHealth - Restart and attempt driver installation again
Registry Editor Fixes (Advanced Users Only)
⚠️ Warning: Registry editing can damage Windows if done incorrectly. Always backup your registry before making changes.
Common registry fixes for wireless problems:
- Delete old wireless profile entries
- Reset TCP/IP stack registry values
- Remove conflicting network adapter entries
- Restore default wireless service configurations
Only attempt registry modifications if you’re comfortable with advanced troubleshooting and have full system backups available.
Performance Optimization After Driver Installation
Configuring Power Management Settings
Windows aggressively manages power consumption, sometimes interfering with wireless adapter performance. Proper power configuration ensures your 802.11n drivers maintain stable connectivity.
Preventing Windows from Turning Off Wireless Adapter
By default, Windows can disable your wireless adapter to save battery power, causing unexpected disconnections:
- Open Device Manager and expand “Network adapters”
- Right-click your wireless adapter and select “Properties”
- Click the “Power Management” tab
- Uncheck “Allow the computer to turn off this device to save power”
- Click “OK” to save changes
Balancing Power Saving vs Performance
Different power plans affect wireless performance differently:
- High Performance: Keeps wireless adapter at full power but drains battery faster
- Balanced: Moderate power management with occasional adapter throttling
- Power Saver: Aggressive power reduction that can cause connectivity issues
Choose power plans based on your usage patterns. Desktop computers should use High Performance, while laptops might prefer Balanced when plugged in and Power Saver on battery.
Laptop-Specific Considerations
Laptop users face unique wireless performance challenges:
- Close laptop lid settings can disable wireless adapters
- Battery level affects wireless transmission power
- Thermal throttling reduces performance when overheating
- USB wireless adapters may perform better than built-in cards on older laptops
Wireless Network Profile Management
Windows stores connection information for every wireless network you’ve used. Over time, these profiles can conflict with each other or become corrupted.
Removing Old/Corrupted Network Profiles
Clean up wireless profiles that cause connection problems:
- Open Windows Settings and go to “Network & Internet”
- Click “Wi-Fi” then “Manage known networks”
- Select problematic networks and click “Forget”
- Reconnect to important networks with fresh credentials
Command line method for advanced users:
- Open Command Prompt as administrator
- Type
netsh wlan show profilesto list saved networks - Type
netsh wlan delete profile name="ProfileName"to remove specific profiles
Setting Preferred Connection Priorities
Windows can automatically connect to preferred networks when multiple options are available:
- List available networks in priority order using
netsh wlan show profiles - Set connection priority with
netsh wlan set profileorder name="ProfileName" interface="Wi-Fi" priority=1 - Higher priority numbers connect first when multiple networks are available
Configuring Automatic Connection Settings
Prevent unwanted automatic connections:
- Open network properties for specific Wi-Fi networks
- Uncheck “Connect automatically when this network is in range”
- Enable “Connect when network is in range” only for trusted networks
- Consider security implications of automatic connections
Speed and Range Optimization
Maximize your 802.11n wireless performance through proper configuration and positioning.
Antenna Positioning for USB Adapters
USB wireless adapters with external antennas perform better with proper positioning:
- Position antennas perpendicular to each other if multiple antennas are present
- Avoid placing adapters behind metal objects or inside enclosed spaces
- Use USB extension cables to position adapters away from computer interference
- Elevate adapters when possible for better signal reception
Channel Selection and Interference Reduction
Wireless networks perform better on less congested channels:
- Download Wi-Fi analyzer software to identify busy channels
- Log into your router’s admin interface
- Manually select channels 1, 6, or 11 for 2.4GHz networks
- Use automatic channel selection for 5GHz networks
- Avoid channels used by neighboring networks
QoS Settings Configuration
Quality of Service settings prioritize important network traffic:
- Access your router’s QoS configuration page
- Prioritize video streaming and video calls over file downloads
- Limit bandwidth for devices that consume excessive data
- Enable gaming mode if available for reduced latency
- Monitor bandwidth usage to identify problem devices
Preventive Maintenance & Future-Proofing
Setting Up Automatic Driver Updates
Keeping 802.11n drivers current prevents many connectivity problems before they occur.
Windows Update Configuration
Configure Windows Update to automatically download driver updates:
- Open Windows Update settings
- Click “Advanced options”
- Enable “Receive updates for other Microsoft products”
- Turn on “Download updates over metered connections” if needed
- Set active hours to avoid restart interruptions
Manufacturer Software Auto-Updates
Brand-specific utilities can automatically maintain your wireless drivers:
- Dell SupportAssist: Scheduled scans for driver updates
- HP Support Assistant: Automatic driver notifications
- Lenovo System Update: Background driver monitoring
- ASUS MyASUS: Regular driver update checks
Third-Party Driver Update Tools (Pros/Cons)
Consider these factors when evaluating driver update software:
Pros:
- Automatic scanning across all hardware
- Scheduled update checks
- Driver backup before installation
- User-friendly interfaces
Cons:
- May install unnecessary drivers
- Subscription costs for premium features
- Potential security risks from unknown sources
- Can install incompatible drivers automatically
Regular System Maintenance Tasks
Preventive maintenance reduces wireless connectivity problems and extends hardware lifespan.
Monthly Driver Checks
Establish a monthly routine for wireless driver maintenance:
- Check Device Manager for warning symbols
- Review Windows Update for available driver updates
- Test wireless connectivity speeds and stability
- Clean temporary files and system caches
- Verify antivirus software isn’t interfering with wireless operations
System Cleaning and Optimization
Regular system maintenance supports optimal wireless performance:
- Run Disk Cleanup to remove temporary files
- Defragment hard drives (HDDs) or optimize SSDs
- Clean registry entries using built-in or trusted third-party tools
- Update all software to current versions
- Remove unused programs that might interfere with networking
Monitoring Network Performance
Track wireless performance trends to identify developing problems:
- Document typical internet speed test results
- Note connection stability patterns
- Monitor signal strength variations
- Record power management behavior changes
- Keep logs of any configuration changes made
When to Consider Hardware Upgrades
802.11n technology has limitations that newer wireless standards address.
802.11n Limitations in Modern Networks
Understanding 802.11n constraints helps with upgrade decisions:
- Maximum theoretical speed: 600 Mbps (real-world: 100-150 Mbps)
- Limited 5GHz band support compared to newer standards
- Higher power consumption than modern wireless chips
- Reduced performance in congested wireless environments
- Limited MU-MIMO capabilities for multiple device networks
Upgrading to Wi-Fi 6 Adapters
Consider Wi-Fi 6 (802.11ax) upgrades when:
- Your internet plan exceeds 100 Mbps consistently
- Multiple devices heavily use your wireless network simultaneously
- You live in area with many competing wireless networks
- Your current 802.11n adapter frequently disconnects or performs poorly
- You’ve upgraded to a Wi-Fi 6 router but haven’t updated your computer’s wireless adapter
Cost-Benefit Analysis
Evaluate upgrade costs against benefits:
Upgrade Costs:
- Wi-Fi 6 USB adapters: $30-80
- Internal Wi-Fi 6 cards: $20-50
- Professional installation: $50-100
Potential Benefits:
- 2-4x faster speeds in optimal conditions
- Better performance with multiple connected devices
- Improved battery life on laptops
- Enhanced security features
- Future compatibility with new router technologies
Alternative Solutions & Workarounds
USB Wi-Fi Adapters as Backup Solutions
When built-in wireless adapters fail or can’t be repaired, USB Wi-Fi adapters provide reliable connectivity alternatives.
Recommended Models for Different Budgets
Budget Options ($15-30):
- TP-Link AC600 Dual Band USB Adapter
- NETGEAR A6100 Wi-Fi USB Mini Adapter
- Linksys WUSB6100M Max-Stream AC600
Mid-Range Options ($30-60):
- ASUS USB-AC68 Dual Band AC1900 Adapter
- D-Link DWA-182 Wireless AC Dual Band Adapter
- Linksys WUSB6300 Dual-Band AC1200 Adapter
High-Performance Options ($60-100+):
- ASUS USB-AX56 AX1800 Dual Band Adapter
- NETGEAR Nighthawk A7000 AC1900 Adapter
- TP-Link Archer T9UH AC1900 High Gain Adapter
Installation and Setup Process
USB Wi-Fi adapters typically install more easily than internal 802.11n drivers:
- Connect the USB adapter to your computer
- Windows will attempt automatic driver installation
- If automatic installation fails, download drivers from manufacturer website
- Run the installer and follow setup prompts
- Configure wireless network connections using Windows or manufacturer software
Performance Comparisons
USB adapters vs built-in wireless cards:
USB Adapter Advantages:
- Easy installation without opening computer case
- Portable between different computers
- Often support newer wireless standards
- Can be positioned for optimal signal reception
- Inexpensive to replace if they fail
Built-in Card Advantages:
- No external device to lose or damage
- Generally better performance due to internal antennas
- Don’t occupy USB ports needed for other devices
- More aesthetically pleasing without external dongles
Mobile Hotspot Temporary Solutions
When 802.11n drivers fail completely, mobile hotspots provide emergency internet access while you troubleshoot and repair your wireless adapter.
Using Smartphone as Internet Source
Most modern smartphones can create Wi-Fi hotspots:
Android Phones:
- Open Settings and go to “Connections” or “Network & Internet”
- Find “Mobile Hotspot” or “Tethering” options
- Enable “Mobile Hotspot” and set network name and password
- Connect your computer to the smartphone’s hotspot network
iPhone:
- Go to Settings > Personal Hotspot
- Turn on “Allow Others to Join”
- Note the Wi-Fi password shown on screen
- Connect your computer using the iPhone’s hotspot
Data Usage Considerations
Mobile hotspots consume cellular data quickly:
- Basic web browsing: 1-3 MB per page
- Email: 10-50 KB per message
- Video streaming: 1-3 GB per hour depending on quality
- Software updates: 100 MB to several GB
- Video calls: 150-1500 MB per hour
Monitor data usage carefully if you have limited cellular plans. Many carriers offer unlimited plans or temporary data boosts for emergency situations.
Setup Instructions for Different Mobile OS
Windows Mobile Hotspot: Some Windows laptops can share ethernet connections via Wi-Fi:
- Connect to internet via ethernet cable
- Open Settings > Network & Internet > Mobile hotspot
- Share connection from “Ethernet”
- Turn on mobile hotspot and connect other devices
Ethernet Connection Alternatives
Wired connections provide reliable internet access while you resolve 802.11n driver issues.
The Powerline Adapters
Powerline adapters use electrical wiring to extend network connections:
- Connect one adapter to router via ethernet cable
- Plug adapter into wall outlet near router
- Connect second adapter to computer via ethernet
- Plug second adapter into wall outlet near computer
- Press pairing buttons on both adapters to establish connection
Powerline speeds vary based on electrical wiring quality but typically provide 100-500 Mbps performance.
USB-to-Ethernet Adapters
Computers without built-in ethernet ports can use USB adapters:
Popular Models:
- UGREEN USB 3.0 to Ethernet Adapter
- Anker USB 3.0 to Ethernet Adapter
- Cable Matters USB 3.0 to Gigabit Ethernet Adapter
Installation is usually plug-and-play with modern Windows versions automatically providing drivers.
Direct Cable Connections
For temporary internet access, connect directly to your router or modem:
- Use ethernet cable to connect computer directly to router
- Configure network settings if automatic connection fails
- Test internet connectivity with direct connection
- Use this stable connection to download 802.11n drivers and troubleshoot wireless issues
Direct connections provide the most reliable internet access for downloading drivers and performing system updates needed to repair wireless connectivity.
Frequently Asked Questions (FAQ)
Installation and Compatibility Questions
“Will 802.11n drivers work on Windows 11?”
Yes, most 802.11n drivers work with Windows 11, but compatibility depends on your specific wireless adapter manufacturer and model. Windows 11 includes built-in support for many 802.11n adapters through generic Microsoft drivers.
However, for optimal performance and full feature access, download Windows 11-specific drivers from your hardware manufacturer. Older adapters from 2008-2010 might require compatibility mode or may not have Windows 11 drivers available.
“Can I use generic drivers instead of manufacturer-specific ones?”
Generic Windows drivers provide basic 802.11n functionality but often lack advanced features like:
- Custom power management options
- Wireless adapter configuration utilities
- Performance optimization settings
- Manufacturer-specific security features
- Advanced antenna configuration
Manufacturer drivers typically offer better performance, stability, and features. Use generic drivers only as temporary solutions while obtaining proper manufacturer drivers.
“How do I know if my driver installation was successful?”
Check these indicators for successful 802.11n driver installation:
- Device Manager: No warning symbols next to your wireless adapter
- Network Connections: Wi-Fi adapter appears in network settings
- Available Networks: Your computer can detect and display wireless networks
- Internet Connectivity: You can successfully connect to Wi-Fi networks and access the internet
- Driver Properties: Device Manager shows current driver version and date
Troubleshooting Questions
“Why does my Wi-Fi keep disconnecting after driver update?”
Frequent disconnections after 802.11n driver updates commonly result from:
- Power Management: Windows might be turning off your wireless adapter to save power
- Solution: Disable power management in Device Manager
- Driver Conflicts: New drivers conflicting with existing software
- Solution: Uninstall old wireless software before installing new drivers
- Incorrect Drivers: Installing drivers for wrong hardware model
- Solution: Verify your exact wireless adapter model and download correct drivers
- Windows Updates: Recent Windows updates interfering with drivers
- Solution: Check Windows Update for additional driver updates
- Router Compatibility: Your router firmware might not work well with new drivers
- Solution: Update router firmware or try different wireless channels
“What should I do if driver installation fails repeatedly?”
When 802.11n driver installation consistently fails:
- Run Installation as Administrator: Right-click installer and select “Run as administrator”
- Disable Antivirus Temporarily: Security software might block driver installation
- Try Safe Mode Installation: Boot Windows in Safe Mode and install drivers
- Clean Previous Installations: Remove all traces of old wireless drivers first
- Check System Files: Run
sfc /scannowto repair corrupted Windows files - Use Different Installation Method: Try Device Manager installation instead of manufacturer installers
“How can I revert to old drivers if new ones don’t work?”
Several methods can restore the previous 802.11n drivers:
1st Method: Driver Rollback
- Open Device Manager and find your wireless adapter
- Right-click and select “Properties”
- Click “Driver” tab and select “Roll Back Driver”
- Follow prompts to restore the previous driver version
2nd Method: System Restore
- Type “Create a restore point” in Windows search
- Click “System Restore”
- Choose the restore point created before driver installation
- Follow restoration process prompts
3rd Method: Manual Driver Installation
- Download the previous driver version from the manufacturer’s website
- Uninstall current drivers in Device Manager
- Install the older driver version manually
Performance and Technical Questions
“Why is my 802.11n connection slower than expected?”
Several factors affect 802.11n wireless performance:
Network-Related Factors:
- Internet plan speed limitations
- Router placement and interference
- Number of devices using the same network
- Wireless channel congestion from neighboring networks
Computer-Related Factors:
- Outdated or generic 802.11n drivers
- Power management settings are throttling performance
- USB wireless adapter positioning and interference
- Background programs are consuming bandwidth
Solutions:
- Test speeds with a wired Ethernet connection to establish a baseline
- Update to the latest manufacturer-specific wireless drivers
- Adjust power management settings for high performance
- Position USB adapters away from interference sources
- Use Wi-Fi analyzer tools to select less congested channels
“Can I use 5GHz networks with 802.11n drivers?”
Many 802.11n adapters support dual-band operation on both 2.4GHz and 5GHz frequencies, but compatibility varies by manufacturer and model.
Check 5GHz Support:
- Review your wireless adapter specifications
- Look for “dual-band” or “5GHz” in the device description
- Check available networks – 5GHz networks should appear if supported
Benefits of 5GHz:
- Less congested than the 2.4GHz band
- Higher potential speeds
- Better performance in dense wireless environments
Limitations:
- Shorter range than 2.4GHz
- Reduced penetration through walls and obstacles
- Not all 802.11n adapters include 5GHz support
“How often should I update my wireless drivers?”
Update 802.11n drivers when:
- Performance Issues Develop: Slow speeds, frequent disconnections, or connectivity problems
- Windows Major Updates: After installing major Windows version updates
- Security Vulnerabilities: When manufacturers release security patches
- New Features Available: Updated drivers adding functionality or performance improvements
- Hardware Problems: If the wireless adapter stops working properly
Recommended Update Schedule:
- Monthly: Check for critical security updates
- Quarterly: Review manufacturer websites for driver updates
- As Needed: Update immediately when experiencing wireless problems
- Major Windows Updates: Always check for driver compatibility updates
Avoid updating drivers unnecessarily if your wireless connection works reliably. The principle “if it isn’t broken, don’t fix it” applies to stable driver installations.
“What’s the difference between WHQL and non-WHQL drivers?”
WHQL (Windows Hardware Quality Labs) Drivers:
- Microsoft-certified through rigorous testing
- Guaranteed compatibility with Windows
- Digital signatures prevent tampering
- Automatic installation through Windows Update
- Generally, more stable but sometimes older versions
Non-WHQL Drivers:
- Newer versions with the latest features and bug fixes
- Faster release cycles from manufacturers
- May include beta features or experimental improvements
- Require manual installation and user acceptance of security warnings
- Potentially less stable but more current
For most users, WHQL drivers provide the best balance of stability and compatibility. Power users who need the latest features might prefer non-WHQL drivers from manufacturer websites.
Conclusion
Installing and maintaining 802.11n drivers doesn’t have to be complicated. By following the step-by-step methods in this guide, you can successfully install the correct drivers for your wireless network adapter and resolve most connectivity issues.
Key Takeaways:
- Always identify your hardware first using Device Manager or manufacturer specifications
- Create system restore points before installing new drivers
- Download drivers from official sources to avoid malware and compatibility issues
- Try multiple installation methods if the first approach doesn’t work
- Optimize power management settings for better wireless performance
- Keep drivers updated, but don’t change working configurations unnecessarily
Remember: When troubleshooting wireless problems, start with simple solutions like restarting your computer and router before moving to advanced driver troubleshooting. Many connectivity issues are resolved with basic network resets.
If you continue experiencing problems after following this guide, consider consulting with a computer technician or your hardware manufacturer’s technical support. Sometimes, wireless adapter hardware failures require professional diagnosis or component replacement.
Final Tips:
- Keep backup copies of working drivers on external storage
- Document your wireless adapter model and working driver versions
- Test connectivity thoroughly after any driver changes
- Consider upgrading to newer wireless standards if your 802.11n adapter consistently underperforms
With proper driver installation and maintenance, your 802.11n wireless adapter should provide reliable internet connectivity for years to come. The investment in time to properly configure your wireless drivers pays dividends in stable, fast network performance.